


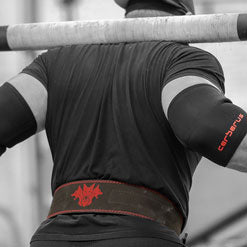


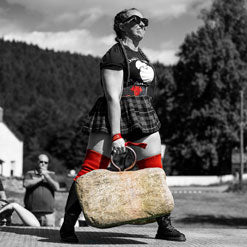

In this blog post I will cover different secondary movements that I like to incorporate to improve the different sections of an atlas stone load to help my overall stone loading game.
Not everyone has continuous access to atlas stones, so I will include how to incorporate barbell lifts and your Cerberus sandbags into your training to boost your atlas stone loading to new heights!
Each exercise explained in the following can again be modified specifically for each individual athlete. Even minute changes to hip, torso angles or starting height can have significant impacts. Taller athletes might struggle with the pick off the floor but do not have to load as high, whereas smaller weight classed athletes might struggle more with the triple extension at the top to reach the required height.
It is imperative that you clearly identify where your weaker points in the lift are; to be able to get the most out of every single exercise and repetition. Do not just go through the motions, but pay close attention to the feedback you are getting from your body.
First off, we need to separate the full atlas stone load into 3 sections of the lift. They can each be trained individually. Depending on the part of the cycle I am in, I incorporate movements from each category on different training days.
The three important parts of the stone lift are:
- Pick off the Floor
- Initial Extension from the lap
- Triple Extension at the top
Improve your pick off the floor
To get a stronger pick off the floor, we do not only need strong glutes and hamstrings, but also a combination of “Squeezing”, chest and upper back strength and also a significant amount of core rigidity to be able to transfer the power from the legs onto the stone. Depending on the size of the stone you want to lift, adjust your stance and positioning accordingly. There is a massive difference in technique between lifting a 17”stone and a 20” stone, so think of your goal stone right off the bat.
Barbell Lifts:
- Frog (light Sumo) Stance Stiff leg Deadlift (1.1)
- Landmine “Atlas Stone Pick” (1.2)
- Goodmorning from/to pins (2.2)
Cable Tower:
- “Hugginator” Chest/Pec Flies (1.3)
Sandbag:
- Full Romanian Sandbag Deadlifts (1.4)
Stone:
- Stone Picks to lap (1.5)
Frog (light Sumo) Stance Stiff leg Deadlift:
Stand on a platform where you are high enough that the pick height is about level with your feet (as low as you can go where you still have room for your feet).
Choose a stance width that is about the same width as the atlas stone you plan to lift. For a 21” Stone load you obviously need a wider stance than if you plan on training for a 17” stone.
Grab the bar just inside of your legs and as close to your legs as possible.
Just imagine how you would normally stand over a stone and try to replicate the stance and arm position as much as possible.
Once you are in position, start with your RDLs, or better, stiff leg Deadlifts from this deficit and pull the bar all the way up until you reach full hip extension. You do not need to keep the bar as close to your legs like you would normally have it in a regular RDL. Since the center of the weight of the Atlas stone will be a bit out in front of you, you can keep the bar a few cm out in front of you or even use an axle bar instead.
Recommended rep scheme for your sets:
X7-10 AHAP (as heavy as possible) in the beginning of the cycle. You can go down as low as 3 reps towards the end of your cycle, but I would not go lower than that.
Side note: Ukranian Deadlifts work great as well if you have a duck walk handle that is long enough so you get a closer resemblance of the wide arm angle you have on a large stone pick, or choose a snatch grip on the barbell deficit deadlifts.
Landmine “Atlas Stone Pick”:
Put a Barbell into a landmine attachment or place it in the edge of a corner of your room or squat rack and load it with bumper plates on the other side.
Place yourself right over the bumper plates, similar to how you would stand over an atlas stone, with the bar leading through your legs towards the landmine attachment behind you.
Bumper plates have a diameter of around 18”, so size wise it comes quite close to what our goal is.
Place your forearms and hands onto the middle of the plate stack (center) and pick them up until you pass the mid of your knee cap with the center of the plates. Stop there and hold this position for around 5 seconds per rep. Think of the same position where you are normally ready to roll the stone over your knees into the lap. The focus here is the squeezing strength with your forearms and hands to be able to hold on to the stone, while pulling it back into your lap.
Recommended rep scheme for your sets:
- picks + 5s isometric hold at knee height/rep AHAP
For Goodmornings to Pins (scroll down)
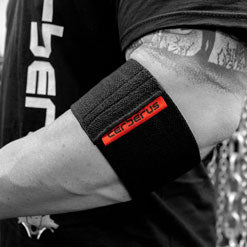
“Hugginator” Chest/Pec Flies:
They are much like normal pec flys, but performed in the same stance and positioning as your stone pick position. Imagine you are hugging a stone with each pec fly repetition.
To start, align yourself right in the middle between the two sides of the cable tower. You can use regular handles to pull with, but I prefer to attach my figure 8 straps onto the cable, pull them over my wrist and place them onto the lower part of my forearm, where I would normally have the contact with the atlas stone.
Bend all the way down and try to mimic your stone pick position. Then simply start with the pec flys in this exact position. By having the figure 8 straps placed on your forearms you isolate your pecs a little bit more, since you cannot add the additional tension from gripping the handles. Once you reach full contraction in the middle, hold the contraction (for 5s) with as much full body tension as possible before going into the next rep.
Recommended rep scheme:
- reps with 5s isometric hold/rep AHAP
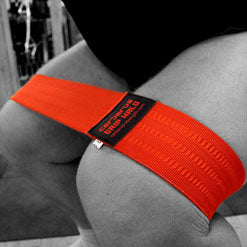
Full Romanian Sandbag Deadlifts (without lapping the sandbag)
We want to skip the part of pulling the Bag into the lap and instead pull all the way through like on a regular Barbell RDL. Keep the sandbag sideways, so you must stand in a wider stance and have a wider pick so it has a closer resemblance of a wider stone. Keep your butt high, with knees slightly bent and pull the Sandbag all the way through until you reach a fully locked out hip (as much as possible with the wide sandbag). Try to hold onto the Sandbag and control it back to the floor instead of dropping it from the top. This will also help you improve your forearm and squeezing strength.
Recommended rep Scheme:
X4-8 reps AHAP (as heavy as possible)
Stone Picks to lap
This does not need much further explanation. Simply perform just the part of the lift where you pick the stone off the floor and roll it into your lap. Pay attention to how high you need to lift each diameter stone to be able to lever it over your knees. The heavier it gets the lower you will be able to pull and the more you will need to use your own bodyweight to counter lever the stone.
Also practice moving your feet into a closer stance right after the lap, to later be able to extend higher. Moving your feet in closer just a little bit will give you a few more centimeters at the top of your triple extension.
I like to incorporate this exercise at the end of my regular stone training session as a backoff set for max reps.
Recommended rep scheme:
1-3x max reps with 80-90% of your max stone.
Extension from the lap
Depending on your levers, your starting position after receiving the stone in your lap will look very different. People with long legs and a short torso will naturally have a higher starting position with their hips and have a very hip dominant load. People with shorter femurs and a longer torso will mostly start with a lower hip position and more upright torso, closer resembling a front squat than a back squat position and have a more quad dominant load. If you belong to the latter category, I would still recommend adjusting your lap position again to get your hips a bit higher and torso more over the stone rather than being behind it, to be able to transfer more of your hip extension power onto the stone. The more upright you are (like in a front squat), the bigger the moment arm of the weight of the stone will be because its center of gravity will be out in front of you, which makes the extension so much harder. By bringing your hips a bit up and your torso more over the stone, you decrease the moment arm and place the center of the weight of the stone more under your center of gravity. This will help you to be able to put more violent hip extension onto the stone, which is much more powerful than just using a “front Squat” style extension.
The following exercise have proven to be a great carryover for this part of the lift. Depending on your form and levers, adjust your stance and joint angles to replicate your stone loading form as much as possible.
Barbell Lifts:
- Zercher Deadlift/Squat (2.1)
- Goodmorning from/to Pins (2.2)
Sandbag:
- Sandbag Load + controlled ecc (2.3)
- Sandbag Front Squat (2.4)
Stone:
- Stone Extension + controlled ecc (2.5)
Zercher Deadlift/Squat
I like to start these off the floor so I have to start each repetition from the lap/knees, instead of taking it out of the rack from the top. Because after all, we are trying to replicate the starting position from the lap. There are many ways how you can perform a Zercher Squat depending what your overall goal is. A torso as upright as possible will result in a more quad dominant squat with less strain on your thoracic spine. Keeping your torso angle leaned forward will shift the load more into your hips and add more strain to your thoracic spine. Depending on your positioning with the stone in your lap, try to replicate your torso angle and hip position from the stone load as much as possible while performing the Zerchers. I like to add a pause at the bottom at every rep to make sure I have a dead stop instead of relying on the stretch reflex.
Recommended rep scheme:
3-7 reps AHAP (as heavy as possible) + short pauses at the bottom to take out the stretch reflex
Goodmorning from/to pins
The best bar to use here is a Safety Squat Bar. If you do not have one, a regular barbell will suffice, but using a SSB (Safety Squat Bar) is recommended. Just like the Zerchers, we want to start the Goodmornings from the bottom right off the pins instead from the top.
Now, depending on how high you set the pins this exercise also works great for the pick strength off the floor if you set the pins much lower to where your torso angle is parallel to the ground or even a tad bit lower.
For more carryover for the load from the hip, you do not need to set the pins quite as low.
Get under the bar and into position and before you start the lift off the pins and make sure to create as much full body tension as possible. Once fully locked out at the top, control the goodmorning slowly back down to the pins and set the bar fully down onto the pins. Do not lose the tension in your body, we only want to fully set down the bar onto the pins so we have to start the next repetition off of a dead stop.
Recommended reps scheme:
3-6 reps + 3s eccentric and full stop on the pin/rep (each rep starts form the pins and ends on the pins)
Sandbag Extension
Again, pick your sandbag sideways instead of upright to replicate a wider stone. The focus here is a violent and explosive extension from the hip. Extend and pull the sandbag up as high as possible, but the main goal remains the initial pull from the lap. You can go as heavy as you can while still being able to at least pull the bag up to sternum height. I will cover the triple extension part under 3.2)
At the top you can just let go of the bag and let it drop to the floor.
Recommended rep scheme:
3-5 reps AHAP
Sandbag Front Squat
With this lift you have the choice of holding the sandbag sideways or upright. Sideways will put more strain on your ability to stay extended in your thoracic spine as compared to keeping the sandbag upright. Either way has great overall carryover to the load from the hip. By keeping the bag upright you will most likely be able to use a heavier bag and squat down lower.
Recommended rep scheme:
6-10 reps AHAP
Stone Extension + eccentric
Like the name implies, it is a regular stone load, but instead of loading it onto a platform or over a yoke right away, we will only extend to about 75% through and control the stone back down onto the lap without loading it. These can be performed by themselves or in combination with a full load.
Example: 1 pick, 1 extension from the lap, back down to the lap, 1 full load from the hip onto a platform.
Depending on the stone weight these can be done with any rep scheme you like or as mentioned in combination with full loads.
Triple Extension at the top
This part is especially important for shorter athletes or if you have a higher loading height in your upcoming competition. This requires not only a powerful and explosive hip extension as covered in 2), but also an incredible amount of thoracic and mid back strength to be able to hit full triple extension.
Barbell Lifts:
- Zombie Front Squat (3.1)
Sandbag:
- Sandbag Extensions to a target + controlled eccentric (3.2)
- Sandbag Gut Carry (3.3)
- Sandbag Front Hold (3.4)
Stone:
- High Loads over Yoke (3.5)
Zombie Front Squat
Improve your Thoracic strength and core rigidity. These will look exactly like your regular front squats, but instead of holding onto the bar, the core ingredient of this lift is NOT to do that. Instead, we want to hold our arms extended out in front of us (crossed arms do not count) with the bar only resting between our front delts and clavicle. I recommend keeping your thumbs pointing up towards the ceiling and palms facing each other to be able to keep your shoulders in external rotation and have a more stable rack position.
By not being able to hold onto the bar for added support, it forces you to stay upright and rigid in your thoracic spine and keep your ribcage and hips stacked. As soon as any of these components gets compromised, you will lose the barbell and it will roll down from your shoulders. The main goal of this lift is to perform it with a slow eccentric portion and pause at the bottom, so you must spend more time holding these positions as perfectly and with as much full body tension as possible. Tempo trumps weight is the motto here.
Recommended rep scheme:
3-5 reps + 3-5s eccentric and a 1-3s pause at the bottom each rep.
Go as heavy as possible while still being able to maintain the tempo with perfect form.
I usually start the cycle at the top end of reps and tempo and decrease the reps and tempo down towards the end, while never decreasing the tempo down to a regular squat tempo.
Sandbag Extension + controlled eccentric
Set up a yoke or use a loading platform to have a target to extend onto. I like to set the Yoke as high as possible to the point of my full triple extension – Standing extended on the balls of my feet with heels in the air, hip and thoracic spine fully extended with arms/shoulders shrugged up. (For me this comes out at 130-134cm at a body height of 169cm) Instead of just doing the regular triple extension with the sandbag (2.2) we are aiming at the target and pull the sandbag up to the edge of the crossmember of the yoke or the edge of the platform. Do not let go of the bag and keep the tension on it. Touch the target/slightly lean the bag onto it and then (from this triple extended position on your toes) lift the bag off the edge and control it back down into your lap. Repeat.
You will need much less weight here than with regular extensions from the hip where the focus was more on the heavier weight/load off the hip. The goal here is to put all the focus on the extension of your thoracic spine and increasing the thoracic strength by including the controlled eccentric back down from the fully extended position.
Sandbag Gut Carry
Again, the target here is your thoracic stability and ability to not give into thoracic flexion or to compensate by leaning back or going into a lumbar extension. Carry the sandbag sideways and high up on the top of your gut/diaphragm. Do not interlock your hands in the front (when carrying sideways you won’t be able to anyways) because we want to make this carry as hard as possible, by walking as upright as possible and having to “row” the sandbag into our gut. Use a weight where you can maintain this form without having to compensate. As soon as you must start leaning back or the sandbag is scooting down towards your belly button stop the carry. Try to increase the time under tension with perfect form first before you move onto a heavier bag.
Walk at a strolling pace. Do not run.
Recommended time:
20-30s carries or 40m as upright as possible, slow pace – increase the weight once you can perform the full distance/time with perfect form
Sandbag Front Hold
The same form from the sandbag gut carries applies here. Instead of walking with the bag we want to do isometric holds with the bag high up on our gut/chest, tightly rowed into our sternum. Initiate the row from you back and slightly “tuck” your elbows to get more latissimus/serratus action as well.
Recommended times:
60-20s holds (light to heavier bag) with perfect form as upright as possible.
As soon as you start to compensate the rep ends
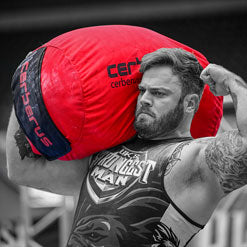
High Atlas Stone Loads over Yoke
This is my favorite variation of regular Atlas Stone loads. I usually only load my stones over a yoke, instead of to a platform, simply because the yoke forces you to have to get into a higher extension. Even with the same loading height, you can’t really use the edge of the crossmember to rest the stone against it like you can on a platform, so you have to pull just that tad bit higher to clear the yoke. What is also important here is to not let go of the stone with that “Chest pop” at the top. Instead stay with the stone a tad bit longer and think of wanting to “dunk it” over the crossmember and guide it all the way.
This makes you extend the lift a little while longer which can be the make it or break it factor. Every centimeter counts! Additionally, this is a great way to get better at stones over bar for reps. By controlling the stone over the bar instead of “yeeting” it, your spotter will be able to roll the stone back to you much faster, which saves a lot of seconds over the course of your reps.
Recommended height:
At least your required regular loading height, higher preferred.
For women our record height is 120cm or 48inches. I like to add 1-2 inches. More with smaller stones (a one-inch bigger stone needs one-inch higher extension!), less with heavier stones.
Example: I want to be able to load a 20” stone over 48 inches, but can only train with a 19” stone weight. Set the Bar at least one inch higher to make up for the smaller stone diameter.
If you have more questions regarding this blogpost or want to improve your technique by receiving individual feedback, I offer personalized 1:1 coaching, programs and video/technique analyses.
If you are interested in any of these services simply contact me on Instagram @sandrabradley_, send me an email at info@sandrabradley.com or visit my website for more information regarding my services at www.sandrabradley.com